|
|
| (12 intermediate revisions by the same user not shown) |
| Line 11: |
Line 11: |
|
| |
|
| <center> | | <center> |
| {| class="wikitable" style="float:center; text-align: center; margin-left:3%" width="55%" | | {| class="wikitable" style="float:center; text-align: center; margin-left:3%" width="60%" |
| |- | | |- |
| ! style="text-align:center; border: 1px solid purple; background-color:#fce6f8; color: #9c0580;" | Serenglade Main Town | | ! style="text-align:center; border: 1px solid purple; background-color:#fce6f8; color: #9c0580;" | Serenglade Main Town |
| |- | | |- |
| | style="padding-top: 8px; border-color: #5c034b;" | | | | style="padding-top: 8px; border-color: #5c034b;" | |
| <br/> [[File:serenglade.jpg|middle|800px|Serenglade]]<br/><br/> | | <br/> [[File:serenglade.jpg|middle|900px|Serenglade]]<br/><br/> |
| |- | | |- |
| |} | | |} |
| Line 605: |
Line 605: |
|
| |
|
| | | |
|
| |
| == '''Refine Room NPC''' ==
| |
| <br>
| |
| <div style="display: flex; justify-content: center; align-items: flex-start; gap: 20px; flex-wrap: wrap;">
| |
| <!-- Table 1 -->
| |
| <div style="width: 280px;">
| |
| {| class="wikitable" style="text-align: center; width: 100%;"
| |
| |-
| |
| ! style="text-align:center; border: 1px solid purple; background-color:#fce6f8; color: #9c0580;" | Keitenai Equips NPC
| |
| |-
| |
| | style="padding-top: 8px; border-color: #5c034b; vertical-align: top;" |
| |
| <div style="text-align: center;"> <br/> [[File:4_F_DRKAFRA01.gif|middle|Keitenai Equips]]</div>
| |
| <p> '''NPC Name: Keitenai Equips''' </p>
| |
| '''Location: zha_in,6,17'''
| |
| |}
| |
| </div>
| |
|
| |
| <!-- Table 2 -->
| |
| <div style="width: 280px;">
| |
| {| class="wikitable" style="text-align: center; width: 100%;"
| |
| |-
| |
| ! style="text-align:center; border: 1px solid purple; background-color:#fce6f8; color: #9c0580;" | Option I
| |
| |-
| |
| | style="padding-top: 8px; border-color: #5c034b; vertical-align: top;" |
| |
| <div style="text-align: center;"> <br/> [[File:equip_brown.gif|middle|Option I]]</div>
| |
| <p> '''NPC Name: Option I''' </p>
| |
| '''Location: zha_in,12,18'''
| |
| |}
| |
| </div>
| |
|
| |
| <!-- Table 3 -->
| |
| <div style="width: 290px;">
| |
| {| class="wikitable" style="text-align: center; width: 100%;"
| |
| |-
| |
| ! style="text-align:center; border: 1px solid purple; background-color:#fce6f8; color: #9c0580;" | Option II
| |
| |-
| |
| | style="padding-top: 8px; border-color: #5c034b; vertical-align: top;" |
| |
| <div style="text-align: center;"> <br/> [[File:equip_green.gif|middle|Otion II]]</div>
| |
| <p> '''NPC Name: Option II''' </p>
| |
| '''Location: zha_in,9,18'''
| |
| |}
| |
| </div>
| |
|
| |
| <!-- Table 4 -->
| |
| <div style="width: 350px;">
| |
| {| class="wikitable" style="text-align: center; width: 100%;"
| |
| |-
| |
| ! style="text-align:center; border: 1px solid purple; background-color:#fce6f8; color: #9c0580;" | Option III
| |
| |-
| |
| | style="padding-top: 8px; border-color: #5c034b; vertical-align: top;" |
| |
| <div style="text-align: center;"> <br/> [[File:equip_blue.gif|middle|Option III]]</div>
| |
| <p> '''NPC Name: Option III''' </p>
| |
| '''Location: zha_in,6,18'''
| |
| |}
| |
| </div>
| |
| </div>
| |
|
| |
|
| |
| <br>
| |
| <div style="display: flex; justify-content: center; align-items: flex-start; gap: 20px; flex-wrap: wrap;">
| |
| <!-- Table 1 -->
| |
| <div style="width: 280px;">
| |
| {| class="wikitable" style="text-align: center; width: 100%;"
| |
| |-
| |
| ! style="text-align:center; border: 1px solid purple; background-color:#fce6f8; color: #9c0580;" | Keitenai Costume NPC
| |
| |-
| |
| | style="padding-top: 8px; border-color: #5c034b; vertical-align: top;" |
| |
| <div style="text-align: center;"> <br/> [[File:4_M_DRZONDA01.gif|middle|Keitenai Costume]]</div>
| |
| <p> '''NPC Name: Keitenai Costume''' </p>
| |
| '''Location: zha_in,27,17'''
| |
| |}
| |
| </div>
| |
|
| |
| <!-- Table 2 -->
| |
| <div style="width: 280px;">
| |
| {| class="wikitable" style="text-align: center; width: 100%;"
| |
| |-
| |
| ! style="text-align:center; border: 1px solid purple; background-color:#fce6f8; color: #9c0580;" | Costume Option I
| |
| |-
| |
| | style="padding-top: 8px; border-color: #5c034b; vertical-align: top;" |
| |
| <div style="text-align: center;"> <br/> [[File:costume_white.gif|middle|Costume Option I]]</div>
| |
| <p> '''NPC Name: Costume Option I''' </p>
| |
| '''Location: zha_in,19,18'''
| |
| |}
| |
| </div>
| |
|
| |
| <!-- Table 3 -->
| |
| <div style="width: 290px;">
| |
| {| class="wikitable" style="text-align: center; width: 100%;"
| |
| |-
| |
| ! style="text-align:center; border: 1px solid purple; background-color:#fce6f8; color: #9c0580;" | Costume Option II
| |
| |-
| |
| | style="padding-top: 8px; border-color: #5c034b; vertical-align: top;" |
| |
| <div style="text-align: center;"> <br/> [[File:costume_red.gif|middle|Costume Option II]]</div>
| |
| <p> '''NPC Name: Costume Option II''' </p>
| |
| '''Location: zha_in,22,18'''
| |
| |}
| |
| </div>
| |
|
| |
| <!-- Table 4 -->
| |
| <div style="width: 350px;">
| |
| {| class="wikitable" style="text-align: center; width: 100%;"
| |
| |-
| |
| ! style="text-align:center; border: 1px solid purple; background-color:#fce6f8; color: #9c0580;" | Costume Option III
| |
| |-
| |
| | style="padding-top: 8px; border-color: #5c034b; vertical-align: top;" |
| |
| <div style="text-align: center;"> <br/> [[File:costume_pink.gif|middle|Costume Option III]]</div>
| |
| <p> '''NPC Name: Costume Option III''' </p>
| |
| '''Location: zha_in,25,18'''
| |
| |}
| |
| </div>
| |
| </div>
| |
|
| |
| <br>
| |
| <div style="display: flex; justify-content: center; align-items: flex-start; gap: 20px; flex-wrap: wrap;">
| |
| <!-- Table 1 -->
| |
| <div style="width: 280px;">
| |
| {| class="wikitable" style="text-align: center; width: 100%;"
| |
| |-
| |
| ! style="text-align:center; border: 1px solid purple; background-color:#fce6f8; color: #9c0580;" | Upgraded Expert NPC
| |
| |-
| |
| | style="padding-top: 8px; border-color: #5c034b; vertical-align: top;" |
| |
| <div style="text-align: center;"> <br/> [[File:4_M_DWARF.gif|middle|Upgraded Expert]]</div>
| |
| <p> '''NPC Name: Upgraded Expert''' </p>
| |
| '''Location: zha_in,10,12'''
| |
| |}
| |
| </div>
| |
|
| |
| <!-- Table 2 -->
| |
| <div style="width: 280px;">
| |
| {| class="wikitable" style="text-align: center; width: 100%;"
| |
| |-
| |
| ! style="text-align:center; border: 1px solid purple; background-color:#fce6f8; color: #9c0580;" | Refining NPC
| |
| |-
| |
| | style="padding-top: 8px; border-color: #5c034b; vertical-align: top;" |
| |
| <div style="text-align: center;"> <br/> [[File:4_M_03.gif|middle|Alexander]]</div>
| |
| <p> '''NPC Name: Alexander''' </p>
| |
| '''Location: zha_in,21,12'''
| |
| |}
| |
| </div>
| |
|
| |
| <!-- Table 3 -->
| |
| <div style="width: 290px;">
| |
| {| class="wikitable" style="text-align: center; width: 100%;"
| |
| |-
| |
| ! style="text-align:center; border: 1px solid purple; background-color:#fce6f8; color: #9c0580;" | Enchanter Stone Master NPC
| |
| |-
| |
| | style="padding-top: 8px; border-color: #5c034b; vertical-align: top;" |
| |
| <div style="text-align: center;"> <br/> [[File:HEROS_IN_ORB_1.gif|middle|Enchanter Stone Master]]</div>
| |
| <p> '''NPC Name: Enchanter Stone Master''' </p>
| |
| '''Location: zha_in,13,10'''
| |
| |}
| |
| </div>
| |
|
| |
| <!-- Table 4 -->
| |
| <div style="width: 350px;">
| |
| {| class="wikitable" style="text-align: center; width: 100%;"
| |
| |-
| |
| ! style="text-align:center; border: 1px solid purple; background-color:#fce6f8; color: #9c0580;" | Stat Stone Seller
| |
| |-
| |
| | style="padding-top: 8px; border-color: #5c034b; vertical-align: top;" |
| |
| <div style="text-align: center;"> <br/> [[File:8_f.gif|middle|Stat Stone Seller]]</div>
| |
| <p> '''NPC Name: Stat Stone Seller''' </p>
| |
| '''Location: zha_in,18,10'''
| |
| |}
| |
| </div>
| |
| </div>
| |
|
| |
| <br>
| |
| <div style="display: flex; justify-content: center; align-items: flex-start; gap: 20px; flex-wrap: wrap;">
| |
| <!-- Table 1 -->
| |
| <div style="width: 280px;">
| |
| {| class="wikitable" style="text-align: center; width: 100%;"
| |
| |-
| |
| ! style="text-align:center; border: 1px solid purple; background-color:#fce6f8; color: #9c0580;" | Bamboo Plant NPC
| |
| |-
| |
| | style="padding-top: 8px; border-color: #5c034b; vertical-align: top;" |
| |
| <div style="text-align: center;"> <br/> [[File:4_b_kadomatsu.gif|middle|Bamboo Plant]]</div>
| |
| <p> '''NPC Name: Bamboo Plant''' </p>
| |
| '''Location: zha_in,16,18'''
| |
| |}
| |
| </div>
| |
| </div>
| |
| <br>
| |
|
| |
|
| == '''Soul Map''' == | | == '''Soul Map''' == |
| Line 797: |
Line 613: |
|
| |
|
| <center> | | <center> |
| {| class="wikitable" style="float:center; text-align: center; margin-left:3%" width="60%" | | {| class="wikitable" style="float:center; text-align: center; margin-left:3%" width="50%" |
| |- | | |- |
| ! style="text-align:center; border: 1px solid purple; background-color:#fce6f8; color: #9c0580;" | Soul Map | | ! style="text-align:center; border: 1px solid purple; background-color:#fce6f8; color: #9c0580;" | Soul Map |
| |- | | |- |
| | style="padding-top: 8px; border-color: #5c034b;" | | | | style="padding-top: 8px; border-color: #5c034b;" | |
| <br/> [[File:soul1.jpg|middle| Soul Map]]<br/><br/> | | <br/> [[File:soul1.jpg|middle|750px| Soul Map]]<br/><br/> |
| |- | | |- |
| |} | | |} |
| Line 814: |
Line 630: |
|
| |
|
| <center> | | <center> |
| {| class="wikitable" style="float:center; text-align: center; margin-left:3%" width="50%" | | {| class="wikitable" style="float:center; text-align: center; margin-left:3%" width="40%" |
| |- | | |- |
| ! style="text-align:center; border: 1px solid purple; background-color:#fce6f8; color: #9c0580;" | Novice Field | | ! style="text-align:center; border: 1px solid purple; background-color:#fce6f8; color: #9c0580;" | Novice Field |
| |- | | |- |
| | style="padding-top: 8px; border-color: #5c034b;" | | | | style="padding-top: 8px; border-color: #5c034b;" | |
| <br/> [[File:novicefield.jpg|middle| Novice Field]]<br/><br/> | | <br/> [[File:novicefield.jpg|middle|600px| Novice Field]]<br/><br/> |
| |- | | |- |
| |} | | |} |
Welcome Neko-RO Adventurer!
We’re excited to have you join our world. Explore the vibrant landscapes, interact with unique NPCs, and embark on thrilling quests. Enjoy your journey and make the most of your adventure in Neko-RO!
Serenglade Map
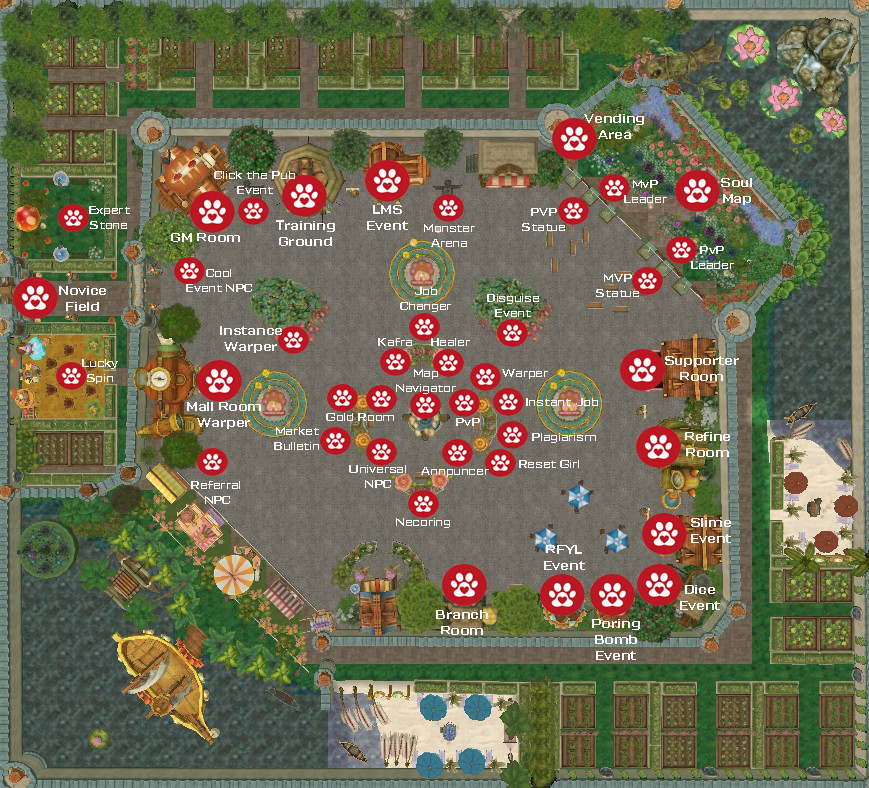
The Serenglade map is a custom map in Neko-RO. It is a town with many beautiful areas and also features NPCs that players need to fulfill their needs as Neko-RO players.
Let's begin by introducing the NPCs.
| Serenglade Main Town
|
|

|
Serenglade NPC
| Freebies NPC
|
For new players, Neko-RO offers freebies to help you get started.
NPC Name: Cool Event
Location: serenglade,46,118
|
| Instance Manager NPC
|
The NPC Instance is a warper for the destinations of Neko-RO’s instances.
NPC Name: Instance Manager
Location: serenglade,67,104
|
| Quest Shop NPC
|
This is where you can craft headgears for the Top, Middle, and Lower slots.
NPC Name: Quest Shop
Location: serenglade,80,131
|
| Class Master NPC
|
   The Class Master NPC allows players to change their job class.
   Note: You must reach the max level and job level required to change jobs.
NPC Name: Class Master
Location: serenglade,96,106
|
| Gold Room NPC
|
The Gold Room is a farming area where you can collect Gold Points, which can be exchanged for Mithril Coin.
Note: 8,000 points are equivalent to 1 Mithril coin.
NPC Name: Gold Room
Location: serenglade,85,91
|
| Instant Helper NPC
|
The Instant Helper NPC allows you to get an instant job, but it is limited to one character per account.
NPC Name: Necoring
Location: serenglade,116,85
|
| Plagiarism NPC
|
The Plagiarism NPC allows Stalker-class players to copy skills using the Plagiarism ability.
NPC Name: Plagiarism NPC
Location: serenglade,116,81
|
| Reset Girl NPC
|
The Reset Girl NPC allows players to reset their skills or stats, and also save their build.
NPC Name: Reset Girl NPC
Location: serenglade,115,76
|
| Healer NPC
|
The Healer NPC is available for all players.
NPC Name: Healer
Location: serenglade,101,92
|
| Kafra Employee NPC
|
The Kafra Employee allows players to save their respawn point and access their storage.
NPC Name: Kafra Employee
Location: serenglade,70,130
|
| Necoring NPC
|
The Necoring serves as a healer rental. It acts like a pet that you can use for instances or hunting. However, it is not allowed in PvP and WoE maps.
NPC Name: Necoring
Location: serenglade,96,62
|
| Broadcaster NPC
|
The broadcaster allows players to announce items for sale, items they are buying, or greetings.
NPC Name: Broadcaster NPC
Location: serenglade,102,79
|
| Two-in-One Manager NPC
|
The Two-in-One Manager is where you can access the Platinum Skills and Breeder.
NPC Name: Two-in-One Manager
Location: serenglade,90,79
|
| Warper NPC
|
This warper allows you to warp to various locations, whether it’s a town or a field map.
NPC Name: Warper
Location: serenglade,105,50
|
| PvP Warper NPC
|
This area allows you to warp to PvP maps. It is also where PvP ladder ranking is enabled.
NPC Name: PvP Warper
Location: serenglade,70,130
|
| Monster Arena NPC
|
The Monster Arena is one of the features of Neko2RO. It is a farming area where players can earn Arena Points and use them to purchase rare items.
NPC Name: Monster Arena
Location: serenglade,101,130
|
| PvP Stats Viewer NPC
|
The PvP Stats Viewer allows players to check the PvP ladder and view individual player rankings.
NPC Name: PvP Stats Viewer
Location: serenglade,142,134
|
| MvP Stats Viewer NPC
|
The MvP Stats Viewer allows players to check the PvP ladder and view individual player rankings.
NPC Name: MvP Stats Viewer
Location: serenglade,153,121
|
| Lucky Spin NPC
|
Spin your luck with the Lucky Spin!
NPC Name: Lucky Spin
Location: serenglade,19,94
|
| Expert Stone NPC
|
The Expert Stone allows you to craft the T3 stone, but it can break during the process.
NPC Name: Expert Stone
Location: serenglade,20,131
|
| Market Bulletin NPC
|
The Market Bulletin NPC allows players to leave messages if they are selling or buying items.
NPC Name: Market Bulletin
Location: serenglade,75,77
|
| Map Navigator NPC
|
The NPC Instance is a warper for the destinations of Neko-RO’s instances.
NPC Name: Map Navigator
Location: serenglade,90,86
|
Serenglade Portal
| Novice Field Warper
|
This warper will take you to the Novice Field.
Portal Name: Novice Field
Location: serenglade,9,111
|
| Mall Room Warper
|
This warper will take you to the Mall Room.
Portal Name: Mall Room
Location: serenglade,50,93
|
| Refine Room Warper
|
This warper will take you to the Refine Room.
Portal Name: Refine Room
Location: serenglade,143,79
|
| Branch Room Warper
|
The Branch Room is a rental room where you can summon MVPs using Bloody Branches or Dead Branches.
Portal Name: Branch Room
Location: serenglade,105,50
|
| Training Room
|
The Training Room allows players to level up faster, as the experience gained there is 10 times the normal rate.
Portal Name: Training Room
Location: serenglade,70,130
|
| Soul Map Warper
|
In the Soul Map, you can find training dummies to practice your skills.
Portal Name: Soul Map
Location: serenglade,157,135
|
| Vending Map Warper
|
The Vending Area is where players are allowed to set up their shops.
Note: A Vending Ticket is required in order to vend here.
Portal Name: Vending Map
Location: serenglade,135,139
|
| Supporter Room Warper
|
The Supporter Room is designated for supporter players. Here, you can find the Titled Milestone NPC.
Portal Name: Supporter Room
Location: serenglade,141,95
|
Serenglade Event
| Last Man Standing Warper
|
|
NPC Name: Last Man Standing
Location: serenglade,88,130
|
| Slime Event Warper
|
|
Portal Name: Slime Event
Location: serenglade,144,57
|
| Dice Event Warper
|
|
Portal Name: Dice Event
Location: serenglade,146,49
|
| Poring Bomb Warper
|
|
Portal Name: Poring Bomb
Location: serenglade,140,49
|
| Run for your Life Warper
|
|
Portal Name: Run for your Life
Location: serenglade,127,49
|
| Disguise Event NPC
|
|
NPC Name: Disguise Event
Location: serenglade,116,102
|
| Click the Pub NPC
|
|
NPC Name: Click the Pub
Location: serenglade,58,130
|
Mall Room
Let's begin by introducing the NPCs.
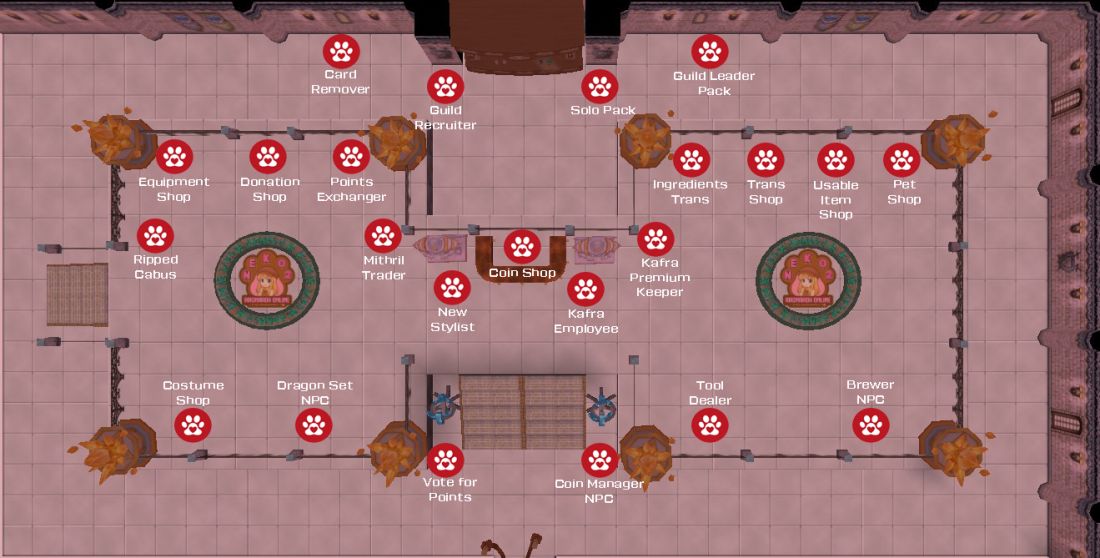
The Mall Room is a small, easily navigable map where you can find various NPCs, including those for quests, coin exchanges, voting for points, and many others.
| Mall Room
|
|

|
Refine Room
Let's begin by introducing the NPCs.
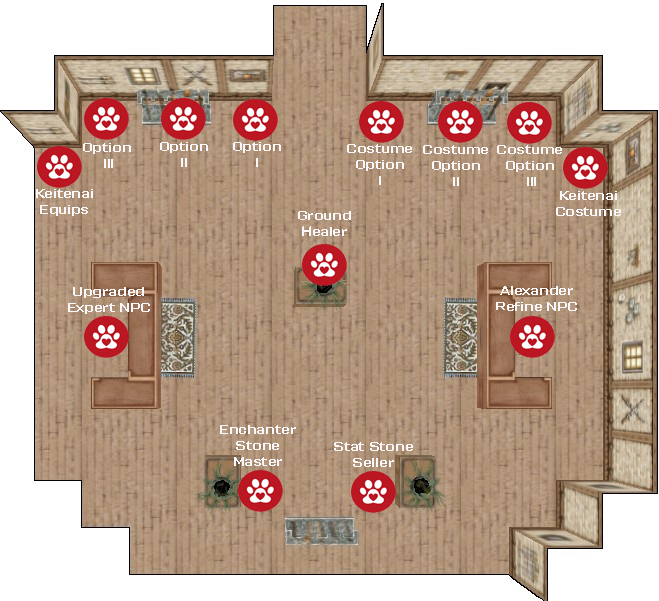
The Refine Room is a small room where you can find the refining NPC and other related features.
| Refine Room
|
|

|
Soul Map
Let's begin by introducing the NPCs.
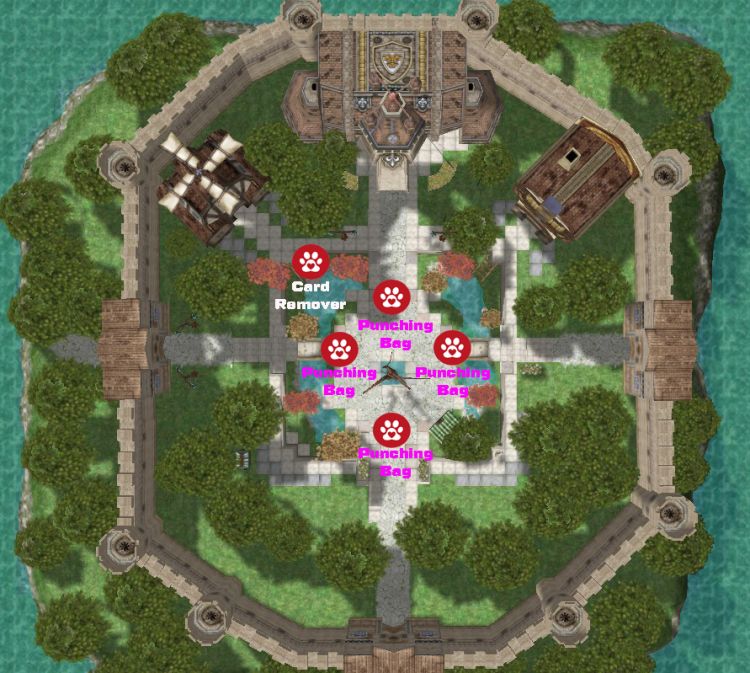
In the Soul Map, you will find training Dummies that players can use to practice their skills, test their damage, or fine-tune their builds without any risk.
| Soul Map
|
|

|
Novice Field
Let's begin by introducing the NPCs.
The Novice Field is the respawn area for new characters. It is a map where you can level up your character up to base level 50.
| Novice Field
|
|

|
Copyright Notice: Neko Ragnarok Online Server
This serves as a warning that Neko RO Server has established its own rules and guidelines.
The content, rules, and sentences created for Neko RO Server are protected under the Intellectual Property Code of the Philippines (RA 8293).
Unauthorized reproduction, distribution, or modification of this work, in whole or in part, is strictly prohibited.
It is explicitly stated that no other RO private servers may copy or replicate the rules and content of Neko RO for any purpose.
Violators may face legal action under Philippine law.
This notice is for the benefit of all RO servers, emphasizing that each server has its own unique regulations that must be respected.
Any attempt to misuse or imitate Neko RO’s content will result in legal consequences, in accordance with the laws of the Philippines.
