Old Glast Heim: Difference between revisions
m (Protected "Old Glast Heim" ([Edit=Allow only administrators] (indefinite) [Move=Allow only administrators] (indefinite)) [cascading]) |
|||
| (33 intermediate revisions by the same user not shown) | |||
| Line 8: | Line 8: | ||
🐾 Party Size: 1+ <br/> | 🐾 Party Size: 1+ <br/> | ||
🐾 Duration: 60 minutes <br/> | 🐾 Duration: 60 minutes <br/> | ||
= Instance Cooldown = | |||
🐾 Time Limit: 1 hour, 30 min | |||
🐾 Map Names: 1@gl_k , 2@gl_k | |||
= Instance Entry = | = Instance Entry = | ||
| Line 25: | Line 29: | ||
</center><br/><br/> | </center><br/><br/> | ||
= Instance Proper = | = Instance Proper [First Segment] = | ||
🐾 Speak with Varmundt to initiate the instance. | 🐾 Speak with Varmundt to initiate the instance. | ||
| Line 68: | Line 71: | ||
</center><br/><br/> | </center><br/><br/> | ||
= | = Second Segment = | ||
🐾 Defeat as many enemies as you can until the system prompts you to search for survivors. | 🐾 Defeat as many enemies as you can until the system prompts you to search for survivors. | ||
| Line 78: | Line 81: | ||
|- | |- | ||
| style="padding-top: 8px; border-color: #5c034b;" | | | style="padding-top: 8px; border-color: #5c034b;" | | ||
<br/> [[File:monster.png|middle|Monster]] | <br/> [[File:monster.png|middle|Monster]]<br/> | ||
<br/> [[File:monster2.png|middle|Monster]]<br/> | |||
<br/> [[File:monster3.png|middle|Monster]]<br/> | |||
|} | |||
</center><br/> | |||
🐾 Speak with Altar Boy Domun to initiate the next phase. | |||
<center> | |||
{| class="wikitable" style="float:center; text-align: center; margin-left:3%" width="20%" | |||
|- | |||
! style="text-align:center; border: 1px solid purple; background-color:#fce6f8; color: #9c0580;" | Map : 1@gl_k 292 | |||
|- | |||
| style="padding-top: 8px; border-color: #5c034b;" | | |||
<br/> [[File:map3.png|middle|1@gl_k 292]]<br/> | |||
|} | |} | ||
</center><br/> | |||
🐾 After speaking with the survivor, the east portal will open. | 🐾 After speaking with the survivor, the east portal will open. | ||
<center> | |||
{| class="wikitable" style="float:center; text-align: center; margin-left:3%" width="20%" | |||
|- | |||
! style="text-align:center; border: 1px solid purple; background-color:#fce6f8; color: #9c0580;" | Map : 1@gl_k 292 | |||
|- | |||
| style="padding-top: 8px; border-color: #5c034b;" | | |||
<br/> [[File:map2.png|middle|1@gl_k 292]]<br/> | |||
|} | |||
</center><br/> | |||
= Third Segment - [ Maggots ]= | |||
🐾 Defeat as many enemies as possible until the system prompts you to search for survivors.<br/> | |||
<center> | |||
{| class="wikitable" style="float:center; text-align: center; margin-left:3%" width="20%" | |||
|- | |||
! style="text-align:center; border: 1px solid purple; background-color:#fce6f8; color: #9c0580;" | Monster | |||
|- | |||
| style="padding-top: 8px; border-color: #5c034b;" | | |||
<br/> [[File:monster.png|middle|Monster]]<br/> | |||
<br/> [[File:monster2.png|middle|Monster]]<br/> | |||
<br/> [[File:monster3.png|middle|Monster]]<br/> | |||
|} | |||
</center><br/> | |||
🐾 Warning: Exercise caution around the Decomposed Body, as it will summon several Maggots capable of defeating even well-equipped characters.<br/> | |||
🐾 However, these Maggots may drop Coagulated Spell, so you may choose to engage them if you are confident in your abilities.<br/> | |||
<center> | |||
{| class="wikitable" style="float:center; text-align: center; margin-left:3%" width="20%" | {| class="wikitable" style="float:center; text-align: center; margin-left:3%" width="20%" | ||
| Line 92: | Line 137: | ||
|- | |- | ||
| style="padding-top: 8px; border-color: #5c034b;" | | | style="padding-top: 8px; border-color: #5c034b;" | | ||
<br/> [[File:monster4.png|middle|Monster]]<br/> | |||
<br/> [[File:npc.png|middle|NPC]]<br/> | |||
|} | |||
</center><br/> | |||
🐾 Speak with Holgren the Destroyer to activate the next portal. | |||
<center> | |||
{| class="wikitable" style="float:center; text-align: center; margin-left:3%" width="30%" | |||
|- | |||
! style="text-align:center; border: 1px solid purple; background-color:#fce6f8; color: #9c0580;" | Heinrich NPC | |||
|- | |||
| style="padding-top: 8px; border-color: #5c034b;" | | |||
<br/> [[File:map4.png|middle|1@gl_k 292]]<br/> | |||
|} | |||
</center><br/><br/> | |||
🐾 Step through the portal to continue. | |||
<center> | |||
{| class="wikitable" style="float:center; text-align: center; margin-left:3%" width="30%" | |||
|- | |||
! style="text-align:center; border: 1px solid purple; background-color:#fce6f8; color: #9c0580;" | Heinrich NPC | |||
|- | |||
| style="padding-top: 8px; border-color: #5c034b;" | | |||
<br/> [[File:map5.png|middle|1@gl_k 292]]<br/> | |||
|} | |||
</center><br/><br/> | |||
= Forth Segment - [ Raydrics ]= | |||
🐾 Defeat as many enemies as you can. The system will alert you to head towards the central northern area of the map. <br/><br/> | |||
🐾Warning: The Corrupted Palace Guard employs Magnum Break, so be cautious when wearing Undead Element/Evil Druid Armor. Additionally, the knockback effect may disrupt your attack connections. Wandering Archers can utilize Arrow Repel, Shadow Attack, and Double Strafe; their attacks are quite powerful. Be careful not to charge into a group of monsters without assessing your damage resistance. | |||
<br/> [[File: | <center> | ||
{| class="wikitable" style="float:center; text-align: center; margin-left:3%" width="20%" | |||
|- | |||
! style="text-align:center; border: 1px solid purple; background-color:#fce6f8; color: #9c0580;" | Monster | |||
|- | |||
| style="padding-top: 8px; border-color: #5c034b;" | | |||
<br/> [[File:monster5.png|middle|Monster]]<br/> | |||
<br/> [[File:monster6.png|middle|Monster]]<br/> | |||
|} | |} | ||
</center><br/> | |||
🐾 This marks the first boss encounter against the Corrupted Soul. While the boss is stationary, it possesses several powerful skills, including Sonic Blow, Hell’s Judgement, and Dark Soul Strike. Wearing armor with an Evil Druid Card will grant you immunity against Stone Curse and Dark Soul Strike. Additionally, the Corrupted Soul is the only Demon race monster found in this instance.<br/><br/> | |||
🐾 Reminder: All party members must stay alive to complete the kill count. After defeating the Corrupted Soul, speak to Varmundt to receive your rewards, which include Temporal Crystals and Coagulated Spells. If you forget to talk to him and complete the instance, a bug may prevent you from accessing the treasure room, which contains a guaranteed seven Coagulated Spells along with other valuable items that can be sold to the NPC for a profit.<br/><br/> | |||
🐾 A portal will appear to the north of the Corrupted Soul’s spawn point. Enter this portal to proceed to the second floor.<br/> | |||
<center> | |||
{| class="wikitable" style="float:center; text-align: center; margin-left:3%" width="20%" | |||
|- | |||
! style="text-align:center; border: 1px solid purple; background-color:#fce6f8; color: #9c0580;" | Map : 1@gl_k 292 | |||
|- | |||
| style="padding-top: 8px; border-color: #5c034b;" | | |||
<br/> [[File:map6.png|middle|1@gl_k 292]]<br/> | |||
|} | |||
</center><br/> | |||
= Fifth Segment = | |||
🐾 Walk north and pass through the NPC to trigger their dialogue. Wait for a while until 2 portals are activated. The red dots represent the east and west portals. You may enter any portal of the portals. Once you are inside, eliminate the mobs until a notification “Evil Forces are appearing in this area”. The green dots represent the possible spawn area for 1st Commander of Destruction while the blue ones represent the possible spawn points of 2nd Commander of Destruction. Upon eliminating them, return to the central pathway and walk north towards the final portal. | |||
<center> | |||
{| class="wikitable" style="float:center; text-align: center; margin-left:3%" width="20%" | |||
|- | |||
! style="text-align:center; border: 1px solid purple; background-color:#fce6f8; color: #9c0580;" | Map : 1@gl_k 292 | |||
|- | |||
| style="padding-top: 8px; border-color: #5c034b;" | | |||
<br/> [[File:map7.png|middle|1@gl_k 292]]<br/> | |||
|} | |||
</center><br/> | |||
🐾 Warning: The majority of the mobs on the second floor are boss-type monsters, which limits your ability to use hiding skills effectively. Additionally, these creatures inflict significant fire damage through skills like Magnum Break and Meteor Storm. | |||
<center> | |||
{| class="wikitable" style="float:center; text-align: center; margin-left:3%" width="20%" | |||
|- | |||
! style="text-align:center; border: 1px solid purple; background-color:#fce6f8; color: #9c0580;" | Monster | |||
|- | |||
| style="padding-top: 8px; border-color: #5c034b;" | | |||
<br/> [[File:monster7.png|middle|Monster]]<br/> | |||
<br/> [[File:monster8.png|middle|Monster]]<br/> | |||
<br/> [[File:monster9.png|middle|Monster]]<br/> | |||
|} | |||
</center><br/> | |||
= Sixth Segment: [ Endgame Boss ] = | |||
🐾 As you approach Himelmez, exercise caution around the Decomposed Bodies scattered throughout the area, as stepping too close may summon a swarm of maggots. It's advisable to either avoid these bodies or eliminate the summoned maggots before engaging the final boss. Proceed north and get close to Himelmez to initiate a dialogue. After that, wait for Amdarais to be summoned. | |||
<center> | |||
{| class="wikitable" style="float:center; text-align: center; margin-left:3%" width="20%" | |||
|- | |||
! style="text-align:center; border: 1px solid purple; background-color:#fce6f8; color: #9c0580;" | Map : 1@gl_k 292 | |||
|- | |||
| style="padding-top: 8px; border-color: #5c034b;" | | |||
<br/> [[File:map8.png|middle|1@gl_k 292]]<br/> | |||
|} | |||
</center><br/> | |||
🐾 Amdarais is an undead boss monster with several formidable skills, including Magnum Break, Critical Slash, and Dark Cross. It’s advisable to bring along some Panacea or Green Potions, as Amdarais can inflict various status ailments like Blind, Chaos, and Silence through his Dragon Fear and Dark Cross abilities. Consider endowing your attacks with fire or holy elements to enhance your damage output.<br/><br/> | |||
🐾 At the beginning of the encounter, use a combination of Resist Fire and fire armor to mitigate the damage from Magnum Break. Ensure your HP stays at a healthy level, as a combination of Magnum Break followed by Critical Slash can quickly drop your health from full to zero, especially for more fragile classes.<br/><br/> | |||
🐾 Your objective is to reduce Amdarais's HP to 50%. At this point, he will start using Dark Cross frequently. Switch to your Shadow Armor to become immune to its damage. Keep in mind that while you will be immune to the damage dealt by Dark Cross, you will still be susceptible to the Blind status effect. Use Green Potions or Panacea to remove the blind status.<br/><br/> | |||
🐾 Warning: If the fight against Amdarais drags on for too long, he will summon various random mobs near his spawn point. If you’re unsure about your damage output, consider pulling him down the stairs to keep your party safe from these spawns. Also, remember that Decomposed Bodies will respawn, so be mindful of their original locations. Only players who are alive will count towards the Amdarais kill count.<br/><br/> | |||
🐾 After defeating Amdarais, speak with Hugin to claim your rewards. You can choose to farm the Maggots from the Decomposed Bodies, as they have a chance to drop Coagulated Spells, and the round shells they drop are essential materials for the Rune Knight's Hagalas Rune Stone. Alternatively, you can access the Treasure Room or leave the instance immediately.<br/> | |||
<center> | |||
{| class="wikitable" style="float:center; text-align: center; margin-left:3%" width="20%" | |||
|- | |||
! style="text-align:center; border: 1px solid purple; background-color:#fce6f8; color: #9c0580;" | Map : 1@gl_k 292 | |||
|- | |||
| style="padding-top: 8px; border-color: #5c034b;" | | |||
<br/> [[File:monster10.png|middle|Amdarais MvP Boss]]<br/> | |||
|} | |||
</center><br/> | |||
= Treasure Room = | |||
🐾 The pink dot indicates the fountain you need to interact with to enter the treasure room. Move south and click on the glass displays to gather the loot. Be sure to keep the Coagulated Spells, while you can sell any miscellaneous items and equipment acquired from the treasure room to the NPC offering overcharge. The standout equipment available here is the Silversmith Bracelet [1], which grants the wearer the ability to use level 5 Spell Breaker. | |||
<center> | |||
{| class="wikitable" style="float:center; text-align: center; margin-left:3%" width="20%" | |||
|- | |||
! style="text-align:center; border: 1px solid purple; background-color:#fce6f8; color: #9c0580;" | Map : 1@gl_k 292 | |||
|- | |||
| style="padding-top: 8px; border-color: #5c034b;" | | |||
<br/> [[File:map9.png|middle|1@gl_k 292]]<br/> | |||
|} | |||
</center><br/><br/><br/> | |||
<center> | |||
= Copyright Notice: Neko Ragnarok Online Server = | |||
<br> | |||
This serves as a warning that Neko RO Server has established its own rules and guidelines. <br/> | |||
The content, rules, and sentences created for Neko RO Server are protected under the Intellectual Property Code of the Philippines (RA 8293).<br/> | |||
Unauthorized reproduction, distribution, or modification of this work, in whole or in part, is strictly prohibited.<br/> | |||
It is explicitly stated that no other RO private servers may copy or replicate the rules and content of Neko RO for any purpose. Violators may face legal action under Philippine law. | |||
This notice is for the benefit of all RO servers, emphasizing that each server has its own unique regulations that must be respected. <br/> | |||
Any attempt to misuse or imitate Neko RO’s content will result in legal consequences, in accordance with the laws of the Philippines. <br/> | |||
<u> | |||
Latest revision as of 13:49, 8 October 2024
Introduction
This dungeon instance offers the highly sought-after and cost-effective Temporal Boots, which can be crafted using materials that can be farmed, specifically Coagulated Spell and Temporal Crystal.
Requirements
🐾 Base Level 130
🐾 Party Size: 1+
🐾 Duration: 60 minutes
Instance Cooldown
🐾 Time Limit: 1 hour, 30 min 🐾 Map Names: 1@gl_k , 2@gl_k
Instance Entry
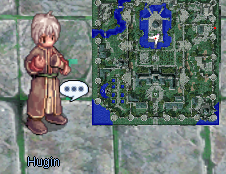
Navigate to the coordinates glast_01 204/273 and find Hugin. The party leader should request him to create a Dimensional Gap. Once it has been generated, enter the instance by speaking with Hugin again.
| Hugin NPC |
|---|
|
Corrupted Soul Hunt new quest received. |
Instance Proper [First Segment]
🐾 Speak with Varmundt to initiate the instance.
| Varmundt NPC |
|---|
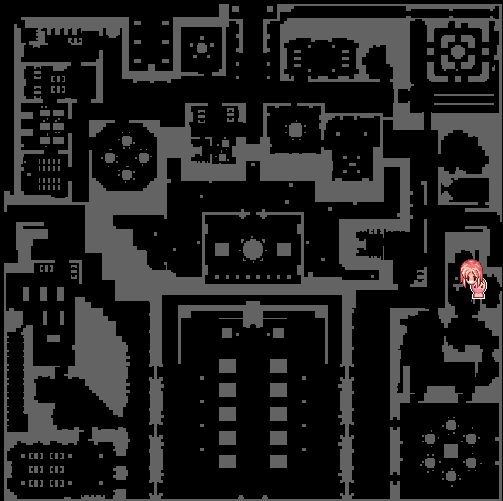
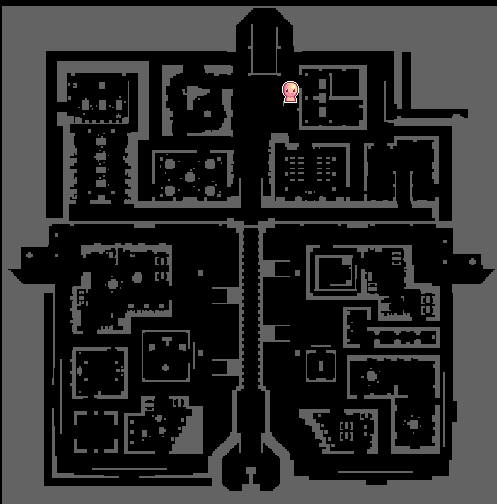
🐾 Proceed north and locate Heinrich. Interact with him to start a cutscene. During their dialogue, you can choose to move away from the center, as several Corrupted Abysmal Knights and Suffering Khalitzburg will be summoned in that area. If you feel confident in your abilities, you can defeat them; however, Heinrich will take care of them after a few seconds, regardless of your choice.
| Heinrich NPC |
|---|
🐾 Head to the left side and wait for a portal to materialize.
| Heinrich NPC |
|---|
Second Segment
🐾 Defeat as many enemies as you can until the system prompts you to search for survivors.
| Monster |
|---|
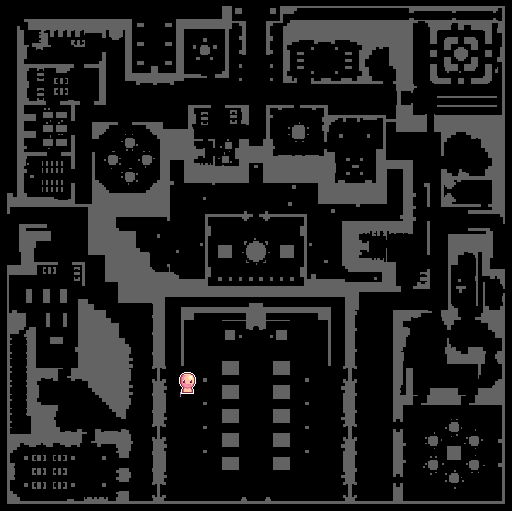
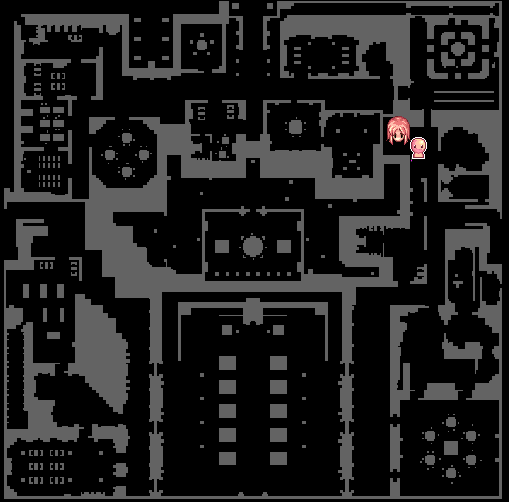
🐾 Speak with Altar Boy Domun to initiate the next phase.
| Map : 1@gl_k 292 |
|---|
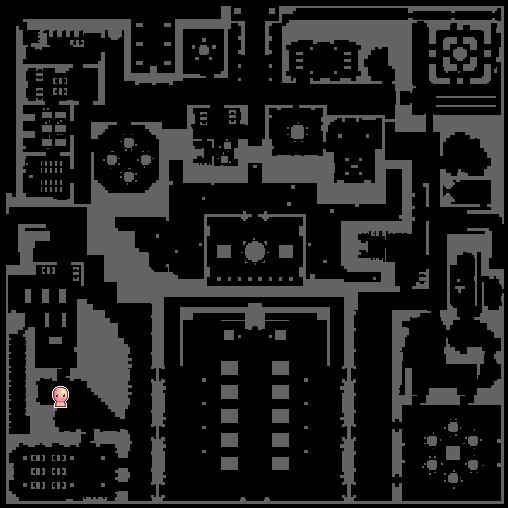
🐾 After speaking with the survivor, the east portal will open.
| Map : 1@gl_k 292 |
|---|
Third Segment - [ Maggots ]
🐾 Defeat as many enemies as possible until the system prompts you to search for survivors.
| Monster |
|---|
🐾 Warning: Exercise caution around the Decomposed Body, as it will summon several Maggots capable of defeating even well-equipped characters.
🐾 However, these Maggots may drop Coagulated Spell, so you may choose to engage them if you are confident in your abilities.
| Monster |
|---|
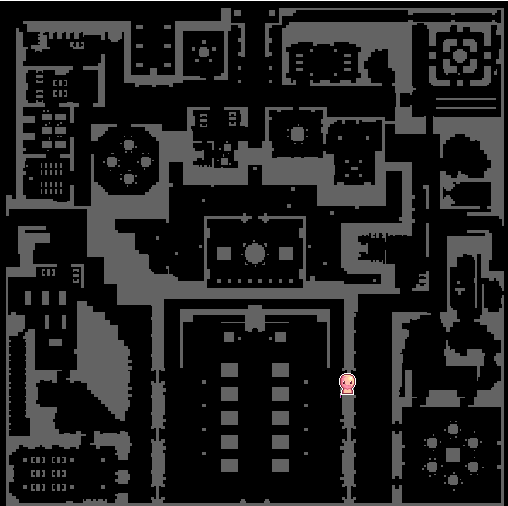
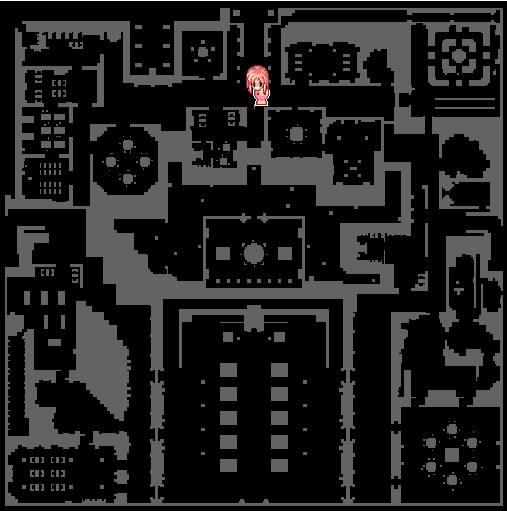
🐾 Speak with Holgren the Destroyer to activate the next portal.
| Heinrich NPC |
|---|
🐾 Step through the portal to continue.
| Heinrich NPC |
|---|
Forth Segment - [ Raydrics ]
🐾 Defeat as many enemies as you can. The system will alert you to head towards the central northern area of the map.
🐾Warning: The Corrupted Palace Guard employs Magnum Break, so be cautious when wearing Undead Element/Evil Druid Armor. Additionally, the knockback effect may disrupt your attack connections. Wandering Archers can utilize Arrow Repel, Shadow Attack, and Double Strafe; their attacks are quite powerful. Be careful not to charge into a group of monsters without assessing your damage resistance.
| Monster |
|---|
🐾 This marks the first boss encounter against the Corrupted Soul. While the boss is stationary, it possesses several powerful skills, including Sonic Blow, Hell’s Judgement, and Dark Soul Strike. Wearing armor with an Evil Druid Card will grant you immunity against Stone Curse and Dark Soul Strike. Additionally, the Corrupted Soul is the only Demon race monster found in this instance.
🐾 Reminder: All party members must stay alive to complete the kill count. After defeating the Corrupted Soul, speak to Varmundt to receive your rewards, which include Temporal Crystals and Coagulated Spells. If you forget to talk to him and complete the instance, a bug may prevent you from accessing the treasure room, which contains a guaranteed seven Coagulated Spells along with other valuable items that can be sold to the NPC for a profit.
🐾 A portal will appear to the north of the Corrupted Soul’s spawn point. Enter this portal to proceed to the second floor.
| Map : 1@gl_k 292 |
|---|
Fifth Segment
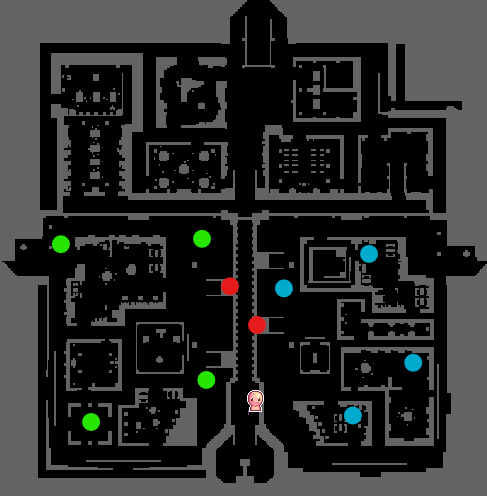
🐾 Walk north and pass through the NPC to trigger their dialogue. Wait for a while until 2 portals are activated. The red dots represent the east and west portals. You may enter any portal of the portals. Once you are inside, eliminate the mobs until a notification “Evil Forces are appearing in this area”. The green dots represent the possible spawn area for 1st Commander of Destruction while the blue ones represent the possible spawn points of 2nd Commander of Destruction. Upon eliminating them, return to the central pathway and walk north towards the final portal.
| Map : 1@gl_k 292 |
|---|
🐾 Warning: The majority of the mobs on the second floor are boss-type monsters, which limits your ability to use hiding skills effectively. Additionally, these creatures inflict significant fire damage through skills like Magnum Break and Meteor Storm.
| Monster |
|---|
Sixth Segment: [ Endgame Boss ]
🐾 As you approach Himelmez, exercise caution around the Decomposed Bodies scattered throughout the area, as stepping too close may summon a swarm of maggots. It's advisable to either avoid these bodies or eliminate the summoned maggots before engaging the final boss. Proceed north and get close to Himelmez to initiate a dialogue. After that, wait for Amdarais to be summoned.
| Map : 1@gl_k 292 |
|---|
🐾 Amdarais is an undead boss monster with several formidable skills, including Magnum Break, Critical Slash, and Dark Cross. It’s advisable to bring along some Panacea or Green Potions, as Amdarais can inflict various status ailments like Blind, Chaos, and Silence through his Dragon Fear and Dark Cross abilities. Consider endowing your attacks with fire or holy elements to enhance your damage output.
🐾 At the beginning of the encounter, use a combination of Resist Fire and fire armor to mitigate the damage from Magnum Break. Ensure your HP stays at a healthy level, as a combination of Magnum Break followed by Critical Slash can quickly drop your health from full to zero, especially for more fragile classes.
🐾 Your objective is to reduce Amdarais's HP to 50%. At this point, he will start using Dark Cross frequently. Switch to your Shadow Armor to become immune to its damage. Keep in mind that while you will be immune to the damage dealt by Dark Cross, you will still be susceptible to the Blind status effect. Use Green Potions or Panacea to remove the blind status.
🐾 Warning: If the fight against Amdarais drags on for too long, he will summon various random mobs near his spawn point. If you’re unsure about your damage output, consider pulling him down the stairs to keep your party safe from these spawns. Also, remember that Decomposed Bodies will respawn, so be mindful of their original locations. Only players who are alive will count towards the Amdarais kill count.
🐾 After defeating Amdarais, speak with Hugin to claim your rewards. You can choose to farm the Maggots from the Decomposed Bodies, as they have a chance to drop Coagulated Spells, and the round shells they drop are essential materials for the Rune Knight's Hagalas Rune Stone. Alternatively, you can access the Treasure Room or leave the instance immediately.
| Map : 1@gl_k 292 |
|---|
Treasure Room
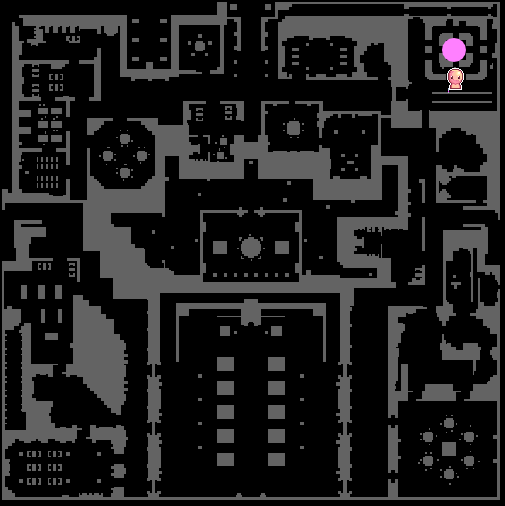
🐾 The pink dot indicates the fountain you need to interact with to enter the treasure room. Move south and click on the glass displays to gather the loot. Be sure to keep the Coagulated Spells, while you can sell any miscellaneous items and equipment acquired from the treasure room to the NPC offering overcharge. The standout equipment available here is the Silversmith Bracelet [1], which grants the wearer the ability to use level 5 Spell Breaker.
| Map : 1@gl_k 292 |
|---|
Copyright Notice: Neko Ragnarok Online Server
This serves as a warning that Neko RO Server has established its own rules and guidelines.
The content, rules, and sentences created for Neko RO Server are protected under the Intellectual Property Code of the Philippines (RA 8293).
Unauthorized reproduction, distribution, or modification of this work, in whole or in part, is strictly prohibited.
It is explicitly stated that no other RO private servers may copy or replicate the rules and content of Neko RO for any purpose. Violators may face legal action under Philippine law.
This notice is for the benefit of all RO servers, emphasizing that each server has its own unique regulations that must be respected.
Any attempt to misuse or imitate Neko RO’s content will result in legal consequences, in accordance with the laws of the Philippines.
